If you’ve ever finished a round with a tiny, nearly invisible join—or created a seamless tube of fabric without turning your work—you’ve already met one of crochet’s quiet heroes: the slip stitch. Often mistaken for “just a joining stitch,” the slip stitch is actually a versatile powerhouse hiding in plain sight. From shaping seamless garments to adding subtle texture or creating dense, sturdy fabric, this unassuming stitch can do far more than you might think.
Yet, many crocheters treat it as an afterthought—something you do quickly before moving on to “real” stitches like doubles or trebles. But what if you could unlock its full potential? What if the slip stitch became one of your favorite tools for clean finishes, creative designs, and professional-looking results?
In this guide, we’ll dive deep into the when, why, and how of using the slip stitch in crochet. You’ll learn its core functions, discover surprising creative applications, avoid common mistakes, and even explore advanced techniques like slip stitch surface crochet and mosaic slip stitch patterns. Whether you’re a beginner who just learned how to chain or an experienced maker looking to refine your skills, these slip stitch secrets will elevate your work—stitch by quiet stitch.
What Is a Slip Stitch—And Why Does It Matter?
At its core, the slip stitch (abbreviated sl st) is the shortest and flattest of all basic crochet stitches. To make one, you insert your hook into the next stitch, yarn over, and pull that loop all the way through both the stitch and the loop already on your hook. Because it adds almost no height, it’s perfect for joining without bulk or creating smooth, tight fabric.
But don’t let its simplicity fool you. The slip stitch is foundational to circular crochet, edging, seaming, and even decorative texture. Without it, you wouldn’t be able to close rounds cleanly in amigurumi, join granny squares invisibly, or create a snug brim on a beanie.
Moreover, because it uses very little yarn, it’s ideal for situations where you want structure without fluff—like button bands, waistbands, or the final edge of a shawl. Think of it as the “invisible thread” of crochet: not flashy, but essential for cohesion and polish.
In fact, many professional designers use slip stitches strategically to eliminate gaps, reinforce stress points, or add subtle definition—all while keeping the overall look sleek and minimal.
The 4 Essential Uses of the Slip Stitch (And How to Do Them Right)
1. Joining Rounds in Circular Crochet
This is the most common use—and for good reason. When working in the round (like for hats, coasters, or doilies), you typically end each round with a slip stitch into the first stitch to close the circle.
Pro tip: To avoid a visible “stair-step” gap, always slip stitch into the very top loop of the first stitch of the round—not into the chain-1 or chain-2 used to start the round unless the pattern specifies. This keeps your rounds aligned and your edges smooth.
2. Moving Your Hook Without Adding Height
Sometimes you need to reposition your hook across a row—say, to start a new cluster or work a motif in the center of a blanket. Instead of cutting yarn and rejoining, simply slip stitch across to your new starting point. Since slip stitches are flat and tight, they won’t distort your fabric or create loose strands.
3. Creating Seamless Edges & Bands
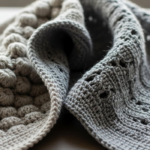
Slip stitches are perfect for edgings that hug the fabric without ruffling. Try working a round of slip stitches around a blanket for a clean, tailored finish—or use them to make a stretchy, non-curling brim on beanies. Because they’re so dense, they provide gentle structure without stiffness.
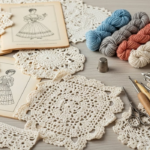
4. Joining Motifs (Like Granny Squares) Invisible Join Method
Forget weaving in dozens of ends! The invisible join (a variation using slip stitches) lets you connect motifs seamlessly as you go. You work the final round of your square, then slip stitch directly into corresponding stitches of the adjacent square. The result? A flat, flexible join that looks like it was crocheted as one piece.
Creative & Advanced Applications You Might Not Know
Beyond basics, the slip stitch shines in design-forward techniques that many crocheters overlook.
🌈 Surface Slip Stitch Crochet
This decorative technique lets you “draw” on finished fabric by working slip stitches on top of your base project. Use a contrasting yarn to add lines, geometric patterns, or even lettering—perfect for customizing tote bags, baby blankets, or holiday stockings. Because slip stitches lie flat, they won’t puff up or distort the underlying fabric.
🧩 Mosaic Crochet with Slip Stitches
In mosaic patterns, you often carry a second color across the back and use slip stitches in the inactive color to create pixel-like designs. The slip stitches lock the carried yarn in place while adding subtle texture. The result? Bold, graphic projects with only one yarn worked per row—great for colorwork beginners!
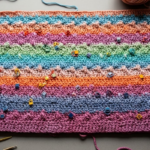
🧦 Slip Stitch Ribbing
Want a stretchy, squishy rib that mimics knitting? Try front or back loop only slip stitch ribbing. Work rows of slip stitches through only the front (or back) loop, and you’ll get a deeply textured, elastic band—ideal for cuffs, necklines, or sock tops. It’s denser than regular ribbing but holds its shape beautifully.
🪡 Seaming with Slip Stitches (Mattress Stitch Alternative)
While the mattress stitch is popular in knitting, crocheters can use a ladder-style slip stitch seam to join pieces invisibly. With pieces held right-sides together, slip stitch through both layers along the edge. Keep tension loose to maintain drape—and watch seams disappear!
Common Slip Stitch Mistakes (And How to Avoid Them)
Even experienced crocheters stumble here. Watch out for these pitfalls:
1. Pulling Too Tight
Slip stitches naturally tighten as you work. If you yank each one, your fabric will pucker or curl—especially on edges. Keep your tension relaxed, and let the stitch do its job without force.
2. Skipping the Final Loop
Remember: you must pull the yarn through both the stitch and the loop on your hook. If you only pull through one, you’ve made a chain—not a slip stitch!
3. Using It Where Height Is Needed
Slip stitches add zero height. Don’t use them to replace single crochet in a row unless the pattern intends a flat transition. Otherwise, your project may end up shorter than expected.
4. Ignoring the Right Placement in Rounds
As mentioned earlier, slipping into the wrong stitch (like the turning chain) can cause spiraling or gaps. Always check your pattern—but when in doubt, slip into the first actual stitch of the round.
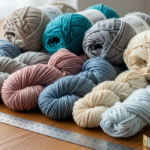
Yarn & Hook Considerations for Best Results
Not all materials behave the same with slip stitches.
- Cotton or linen yarns create crisp, defined slip stitches—great for edgings or surface crochet.
- Wool or wool blends offer slight elasticity, making them perfect for ribbing or stretchy bands.
- Avoid slippery synthetics (like some acrylics) for slip stitch seams—they can loosen over time.
As for hooks: a smooth, tapered hook (like bamboo or aluminum) glides easily through tight slip stitches. If you’re working surface slip stitch, consider using a smaller hook than your base fabric to keep the overlay neat and subtle.
Why Mastering the Slip Stitch Elevates Your Crochet
Think of the slip stitch as the secret weapon of refined crochet. It’s the difference between a project that looks “homemade” and one that looks professionally crafted. Clean joins, invisible seams, tailored edges—these are the hallmarks of a thoughtful maker.
But beyond aesthetics, slip stitches offer functional intelligence: they reinforce, stabilize, and connect without adding bulk. In a world where sustainability matters, using minimal yarn for maximum effect is not just clever—it’s conscious crafting.
Plus, once you see what slip stitches can do, you’ll start designing with intention. You’ll choose them not out of habit, but because they solve a problem or create a specific effect. That’s the mark of a confident, creative crocheter.
Conclusion: Embrace the Quiet Power of the Slip Stitch
The slip stitch may never be the star of your stitch dictionary—but it’s the trusted supporting actor that makes every scene shine. From its humble role in joining rounds to its surprising power in texture and design, this tiny stitch is a gateway to cleaner, smarter, and more intentional crochet.
So next time you reach for your hook, don’t breeze past the slip stitch. Pause. Consider it. Use it with purpose. Whether you’re closing a round on a baby hat, adding a monogram to a gift, or crafting a seamless sweater yoke, let the slip stitch be your quiet ally in creating work you’re proud to show off.
Now it’s your turn! Have you used slip stitches in a creative way? Tried surface crochet or mosaic patterns? Share your favorite slip stitch hack in the comments below—or tag us in your projects on social media! And if you found this guide helpful, pass it along to a fellow crocheter who’s ready to level up their craft. Happy stitching!🪡✨

Luiza Santos is a passionate crochet and knitting enthusiast who finds joy in transforming simple yarn into meaningful, handmade creations. With a deep love for texture, color, and craftsmanship, she believes every stitch carries a story. Luiza brings warmth, creativity, and years of hands-on experience to everything she makes, inspiring others to discover the beauty of fiber arts.